Friday 18 July 2014

Making GIF from video in Adobe Premiere Pro - Tutorial


 Hi guys, I'll show you how to create GIF (Graphics Interchange Format) from videos using the software Adobe Premiere Pro. I am using CC version to give this tutorial.

Step 1
At first, create a new project in Premiere.

Project Window in Adobe Premiere Pro CC

Use of Content-Aware Move Tool in Adobe Photoshop


 The use of Content-Aware Move Tool in Adobe Photoshop helps digital artists to perform some specific tasks such as moving the selected pixels to a certain part of image, making a copy of selected pixels and replacing them with accurate match with nearby pixels. While using the tool, you may notice that it have some similarity with Clone Stamp Tool. In this tutorial I'll show you the use of this amazing tool in simple words.

Step 1 
At first open a picture that contains a group of specific things. Though it is not important, Content-Aware Move Tool works best with this type of pictures. Here is a picture I've opened in Photoshop.

How to Install and Uninstall Fonts in Windows

 In Windows installing and uninstalling fonts can be done easily. Let's see how we can install a font. Before that, if you are trying to install a font by downloading from a website, take care to download from a website that you can trust.

To Install a Font 

Step 1
Open the font which you want to install.

Font installing window

How to Fix Sudden Disappearance of System Icons in Windows

 You may face this issue while running Windows Vista or Windows 7 for the first time or after a long break. In most occasions, one or more of the icons listed below will disappear from lower-right corner of the Taskbar.

Most probably, you will try to make it appear by going through Turn system icons on or off in the Notifications tab in Taskbar. But you will be shocked to see that the icon (which is disappeared) can't be selected.


(Here) Power icon can't be selected

How to Create Subtitles (.srt files) without any Software


You might be excited to know how the subtitles in films are created. In this tutorial I'll show you how to create subtitles (.srt files) without the need of any additional other than our 'poor' Notepad.

Step 1
 
There is a simple format for creating subtitles in Notepad. You should assign it like this:

Format for creating subtitles in Notepad


Drawing a Disney Character in Adobe Flash Pro


Hi guys, here is an interesting tutorial on drawing a Walt Disney character in Adobe Flash Pro.

At first, you will need a 'handsome' Disney character. Here, I used a dwarf character from the famous Disney film Snow White and the Seven Dwarfs.

You can use it or you can search and find for other from Internet. It will be good if you could get a sketch.


Sketch of Dwarf (A character in the film Snow White and the Seven Dwarfs)
Step 1
Open Adobe Flash.

Click on ActionScript 3.0 (Inside the circle)
Step 2
Click on ActionScript 3.0.

Time Remapping in Adobe Premiere Pro

Time Remapping in Adobe Premiere Pro is much easier than any other software available. Here I'm showing you, how to remap a video sequence according to time in Adobe Premiere Pro CC, the latest version.  You can do this with the version available in your system.Before starting, I hope you've basic knowledge on what does this 'Time Remapping' actually mean! If not, I'll explain it for you, a bit. Time Remapping can otherwise said to be 'creating fast/slow motion'. The process we are doing is making the movement of frames faster or slower by changing the timing. That's why it is usually called Time Remapping.


Step 1
OK. Let's start by opening a new Adobe Premiere Pro project and creating new sequence.

New Project window

How to Create a Torrent file


According to latest reports number of Torrent users has increased to 160 million per month. Since it is one of the best method to share large sized files, number of users are increasing day by day. Here I'm giving a tutorial on how to create a Torrent file...

There are many softwares to share Torrent files such as uTorrentBitTorrent etc... And you could create Torrent file from any of this softwares. Here is a list of BitTorrent client softwares so you could choose appropriate one. This tutorial is based on uTorrent, which is a free BitTorrent client software.
Step 1
Open uTorrent.

How to Know Popularity of your Website/Blog


It will help us to make massive changes in our website if we could know how popular it is, isn't it? Yeah, I'll show you how to check the current status or rank of your website/blog in global level...
Have you heard about a website named Alexa Internet? If not, you must have noticed a name Alexa rank and number near to it, while surfing in Wikipedia and all. Here is an example.


Alexa rank of alexa.com
Step 1
So, we can find the global rank of our website too. For that go to the homepage of alexa.com. You'll see something like this there.

How to Determine whether your System is Running on 32-bit or 64-bit Windows


You can determine whether your system is running on 32-bit or 64-bit Windows by just two clicks..!
Step 1 
Right Click on Computer and choose Properties

Right Click on Computer and choose Properties
Step 2
Under System, you could find System Type. There you can see whether your system is 64-bit or 32-bit.

Right to the System type you could find whether your system is running or 64-bit or 32-bit Windows

That's all..!

How to Delete your Blogger Blog


If you attempt to delete your blog in Blogger, it will be permanently deleted after 90 days. So, think wise before you delete your blog. Deleting a blog in Blogger is very easy..! Let's check how we can do it.

Step 1.  
Go to your Blogger Dashboard. Select the Drop-down Menu near the blog you want to delete and choose Settings.

Choose Settings from the Drop-down menu in Blogger Dashboard
Step 2.
Now select Other from the left-side menu.

How to Fix Windows couldn't find Bluetooth or other Wireless devices


Here are some reasons for Windows couldn't find Bluetooth or other wireless devices and solutions to fix it.
Reason 1
Bluetooth mayn't be On in your PC or device.

Solution - Make sure that your PC and device supports Bluetooth. Sometimes software to Turn On Bluetooth hardware mayn't be installed in your PC correctly. You can check this by going to Programs and features in Control Panel. You must contact your manufacturer for getting this software or utility.

WIDCOMM Bluetooth Software for Dell computers

How to Fix getting error code 0x8004FF6F while attempting to uninstall MSE


Sometimes you might have experienced getting the error code 0x8004FF6F while attempting to uninstall Microsoft Security Essentials (MSE). Here is a solution to fix this and uninstall MSE without any problem.

Step 1
Go to this link and click on Run Now button.

Microsoft Fix it Homepage

How to Fix Memory card getting undetected in USB Modem


Today most of USB Modems have facility to read Memory cards. But sometimes due to the software error, there might be occasions when Memory card being undetected by the device. Here are three methods to fix Memory card being undetected in Windows while it is in USB Internet Dongle/Datacard/USB Wireless Modem/Netsetter. The methods given below works with almost all USB Modems such as Huawei DatacardIdea NetsetterVodafone USB StickAirtel 3G Dongle etc...
Method 1

Try uninstalling and re-installing the USB Modem software.

Mobile Partner, a software in Huawei Datacards


How to Schedule Shutdown and Hibernate in Windows

In Windows, we can schedule a task using the facility named Task Scheduler. So, let's check how can we schedule a Shutdownand Hibernate task to be performed later in Windows 7.

Step 1
Go to the Search column in Start Menu and type Task Scheduler or just Task and press Enter key.

Type Task Scheduler and press Enter

How to Fix Drag and Drop Not Working issue in Windows


You might experience this issue sometimes, after installing or uninstalling some programs and applications. The major reasons behind this issue is unknown.
Anyway I've a found a simple solution to solve this from Microsoft Community. Thanks for the buddy who posted it there..!

Step 1
Click and Hold the Left Mouse Button in Windows Explorer and press Esc key. That's all! Click and Drag will be re-enabled wonderfully.

Illustration showing how to fix Drag and Drop Not Working

How to Print Screen with Cursor in Windows


As you know, by default in Windows, you can Print Screen with Print Screen Key. But unfortunately, cursor will not be printed in it. Some may say that, pressing Ctrl + Print Screen will solve this issue..! Truly, it will not..! The only way to Print Screenwith cursor is by using external applications.
I'll introduce you a free software for this purpose - Gadwin PrintScreen Proffessional. You can download it by clicking the link. It's a small software to Print Screen according to our will. Let me show you how to use it.

Step 1
Download and Install the software.

Download and Install Gadwin PrintScreen Proffessional

Combine PDF files in Adobe Photoshop


Combining PDF files in Adobe Photoshop is much easier. You can combine PDF files through the PDF Presentation option in Photoshop. I'll show you how to combine PDF's in Photoshop.
Step 1
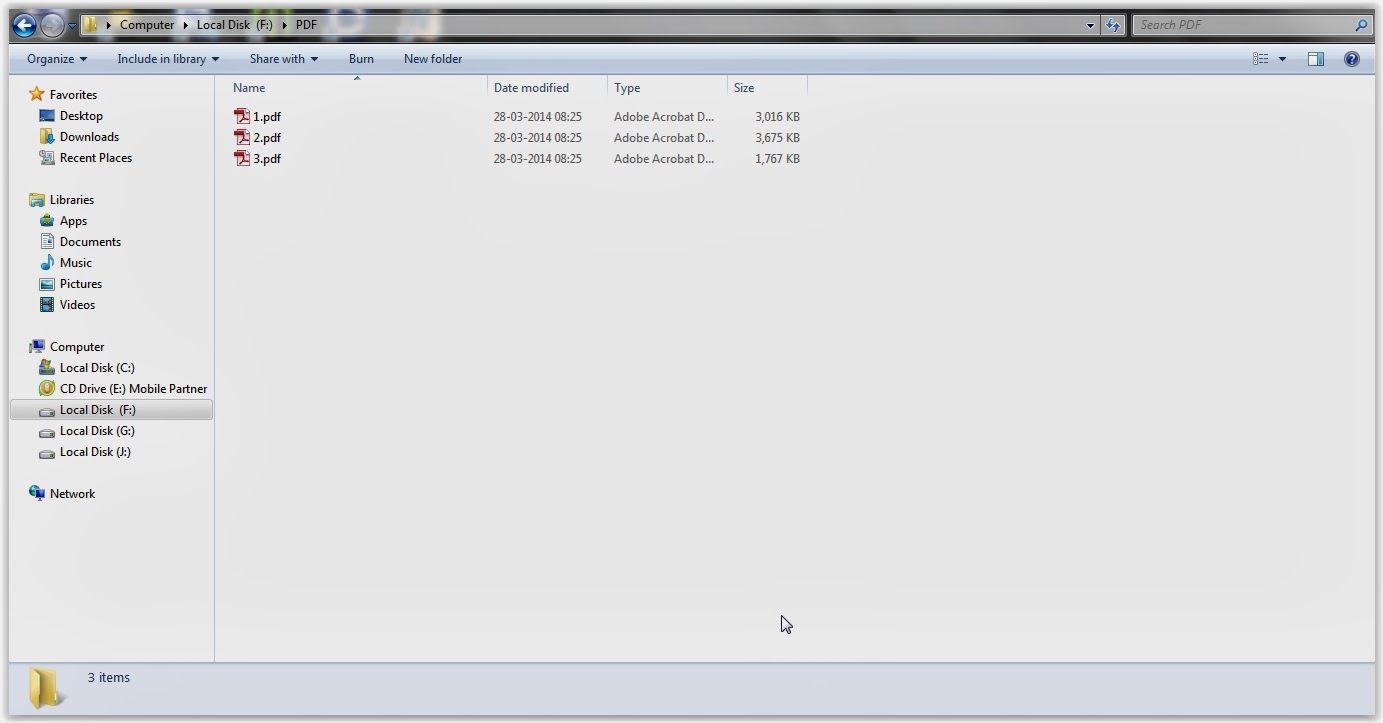
Here are the PDF files I'm going to combine in Adobe Photoshop.

PDF Files
At fist, Open Adobe Photoshop. Choose File → Automate → PDF Presentation.

How to Fix Missing of Actual Icon Image in Windows


That's a quite often error you might have faced in your Windows. You'll be wondered to see another icon (may be icon of MS OS) image instead of usual icon image in shortcuts, when you opened your system someday..!

From my experience, this could happen when you've installed a program or application in the previous day before this happening. Here is a simple solution to fix this error and retrieve the actual icon image.
What we are going to do here is rebuilding the Icon Cache. This will refresh the icons and will fix errors inside it.

Step 1  
Close all opened windows and applications. Now, press Ctrl + Shift + Esc or run Task Manager.

Run Task Manager

Customize Transition in Adobe Premiere Pro


Customizing the default Video/Audio Transition in Adobe Premiere Pro is much easier than any other video editing softwares. Customizing transition in Adobe Premiere is otherwise said to be known as A/B Mode Fine-tune Transition. In this tutorial we are going to learn how to customize a transition in Adobe Premiere Pro CC [No need to worry if you don't have this version, you can try this out from any CS version].


Step 1

At first create a new project and sequence in Adobe Premiere Pro.

Creating a new project


How to Speed up Downloading in Slow Internet Connection using IDM

Have you cursed your ISP for slow internet connection, while your important downloading get stuck at somewhere in the middle? IDM or Internet Download Manager is one of the best downloading softwares available today. They accelerate the speed of downloading about 3 times than other downloading softwares. If you wish to have it installed in your computer, you can get one by going through this link. Here, in this tutorial I'm going to show you how to speedup downloading if you've got a very slow internet connection using IDM...!

Step 1
Open IDM and click on Options.

Click on Options

Use of Patch Tool in Adobe Photoshop


As we all know about the use of Content Aware Move Tool in Adobe Photoshop, Patch Tool is somewhat similar in use but different with some important uses. In this tutorial we're going to know deeply about the use of Patch Tool in Adobe Photoshop.
First, let me describe about the purpose of Patch ToolPatch Tool, by the name itself patch selected pixels with another pixels and matches it by making slight changes on them.

Step 1
First of all, Open a picture you want to test the use of Patch Tool in Adobe Photoshop.

A picture is opened on Adobe Photoshop
Step 2 
Now, select Patch Tool Patch Tool from the Tools Panel

Selecting Patch Tool


How to Add Animated Back to Top Button in Blogger

I suppose you might have seen stylish and animated Back to Top button in several websites and blogs. In this tutorial I'll show you how to implement one in your Blogger Blog. It will look alike as in my blog. You can change the code and make it stylish according to the theme of your blog.

Step 1
Go to Blogger Dashboard. Select your blog and click on Template → Edit HTML.

Click on Edit HTML


How to Download a Wikipedia Article/Book as PDF


Wikipedia, the biggest free Encyclopedia has ranked #6 as the World's Most Visited Websites by Alexa. I hope you might have visited Wikipedia many times for references on varied topics. In this tutorial I'll show how we can download a Wikipedia Article as PDF. It's very useful so that we can use the Article offline. It's very simple and we will get the whole article including images with one click.

Step 1
Go to the Wikipedia Article you need to download.


Step 2
On the left side of the page, expand Print/export.


How to Fix Rough Font Issue in Adobe Reader in Windows


This is rare issue that you might have faced due to misunderstanding of changing the settings of Adobe Reader. Due to this, the font of the PDF document that you're reading will be changed to rough and sharpen which makes unpleasant for eyes for reading. We can reinstate the characteristics of fonts by editing Preferences...

When you are facing this issue font of your document will look like something as seen below in the picture.


Let's see how to fix it.

Step 1
Choose Edit → Preferences... or press Ctrl + K.

  
Step 2
From the newly opened Preferences window, select the category Page Display on the left side.

How to Open SBI Bank Account Online


Now a days, many people are depending on online banking facilities. As it is easy and quick the no. of users are increasing. In this tutorial, I'll show you how to open a Bank Account in State Bank of India via online.
Before reading the steps, I insist you to keep these along with you:
  • Aadhaar Card
  • Voters ID Card
  • Any other documents as address proof
  • Pen and Paper
[Note
Don't forget to CHECK ALL DETAILS you've given, before submitting the application. After submitting the application you CAN'Tedit details.

Step 1
At first go to this link. You'll get a window like this.


Import Media in Adobe Premiere Pro


This tutorial is aimed for very beginners in Adobe Premiere Pro. In this tutorial, we'll learn how to import media files to the project bin in Premiere Pro.

Step 1 
Open Adobe Premiere Pro and create a new project and sequence.

Step 2
Now, go to File  Import... or press Ctrl + I.


How to Remove 'Subscribe to: Post Comments (Atom)' in Blogger


If you think, it's so annoying to see 'Subscribe to: Post Comments (Atom)' in your Blogger Blog, we can remove it by editing the default template. Let's see how we can do this.
This is what we are going to remove from our blog.


Step 1
At first go to Blogger Dashboard and select your blog.

Step 2 
Go to Template → Edit HTML. 


How to Find Own Mobile Number Without Phoning


Suppose if you're in a situation where you couldn't recall your mobile number and there is no balance in your phone.. With the help of USSD codes, you can find your forgotten mobile number. Depending on the MNOUSSD will differ. Here I provide you a list of USSD codes to find your mobile number.


Mobile Network Operator
USSD
Aircel
*1# or *234*4# or *888# or *122*131# or *131#
Airtel
*140*175 or*140*1600# or *121*9# or *282#  *141*123#
BPL
*222# *1# *001#
BSNL
*123# or *1# or *99# or *222#
Idea
*789# or *100# or *1# *147# *131# or *131*1#
Loop
*222# *1# *001#
MTNL
*8888#
MTS
Send a message NUM to 51230
Reliance
*1# *111#
Smart
*1# *111*2#
T24 Mobile
*580#
Tata Docomo
*1#  or *580# or *124#
T-Mobile
#NUM# or #686#
Uninor
*222*4# or *444# *555# *1#
Videocon
*1#
Virgin
Send a message NUM to 51230 or *1#
Vodafone
*555# or *555*0# or *111*2# or *777*0# or *131*0#


Dial either one of the USSD codes given above depending on your MNO. If one of the code didn't worked try the other one. Depending on your location the USSD code may vary. You'll get the mobile number displayed or will receive the number as a message.  

Black & White and Colour Mix Effect in Photoshop


Although Black and White pictures have less impact now a days, majority of the Graphic Designers wishes to mix black & white with colour to produce new stylish images. With the help of Designing Softwares this has became more easier. Among them one of the popular graphic design method is, selecting one or some of the elements in a colour photograph and keeping them in colour while, the latter elements are converted to black and white..!

Since Photoshop has a vast number of tools and options, various methods have been adopted to implement this in a stunning way. And  here I'm providing you one of the simplest method that anyone can try if you've Photoshop installed in your system.

Step 1
As usual, open up a picture in Photoshop which have centralized elements in it. For eg: A man sitting on a bench, Bunch of flowers on a plant etc.. I'm insisting this because, the effect works well with this kind of images.


How to Hide/Remove a Widget/Gadget in Blogger


Usually the Gadgets/Widgets can be removed by editing them in the Layout window of Blogger. But some widgets can't be hide by editing the Layout, for eg: the default attribution 'Powered by Blogger'. But this can be hide with the help of some CSScodes by adding them to the Template. Let's see how we can do this.

Here, as in the example; I'll show you how we can hide the attribution 'Powered by Blogger'. We can hide a Widget/Gadget in two ways.
  1. By editing the HTML of Template directly
  2. By customizing the Blogger Template Designer
Let's go first with Method 1.

Step 1
At first go to your Blogger Dashboard and select Template → Edit HTML.


Step 2 
Now, press Ctrl + F and search for </head> tag.  

How to Schedule a Post in Facebook


Schedule Posting is one of the popular method used in the web. It is very useful in a way that, we can post our articles to our readers even if we don't have time to do that. Let's see how we can schedule a post in the popular social networking site,Facebook.


Step 1  
Log in to your Facebook account.

Step 2 
Prepare your post on Status.


Create Titles for Videos in Adobe Premiere Pro


We all know that without attractive titles, a media presentation will not make sense among audience. And when it come to the case of films, titles have a major role for Opening credits. During the Post-production works, every film editor tries to make most out of this. Now a days, anyone can create stylish titles for their own footage with the only help of softwares. So, let's see how we can create a simple title using Adobe Premiere Pro in this tutorial.

I'm showing this tutorial in Adobe Premiere Pro CC, which is the latest version. You can try this with any version.

Step 1
Create a new project and sequence.

Step 2
Import the footage you want to add title.

How to Use Peek, Shake and Snap Features in Windows


The PeekShake and Snap features are widely used among Windows users. Yet, I'm sure that many people are there, who're not aware about these features and struggling to know what is the use and how to use them. And I'm aiming this tutorial for those people..!

Peek

First let's know about the Peek feature. The Peek feature allows a user to preview the Desktop and buried windows (programs that are hiding from currently opened window) without minimizing the current-opened window. You'll understand more, while learning how to use it.

Suppose if we've too many programs/windows opened as in the screenshot.


Convert/Encode Video and Audio using Adobe Media Encoder


Adobe Media Encoder, which is a stand-alone application that is mostly used along with Adobe Premiere Pro. It's a very useful tool, that can be used to encode or convert media files into our desired format. As some of the files are not directly supported for editing in Premiere Pro, you can use Media Encoder to encode them. In this tutorial, we're going to learn, how to do this.


Step 1
Launch Adobe Media Encoder.


Step 2
Go to File → Add Source.... or press Ctrl + I.

How to Add Google Custom Search to your Blog


If Google Custom Search is added to your blog or website, it will help a visitor to search on your site and find what he needs directly from archives. Almost all of the popular sites are using this feature as it makes a visitor happy..☺. Let's learn how to add Google Custom Search (GCS) to our blog.

Step 1
Go to Google Custom Search.


Step 2
Now click on New search engine.

How to Customize Google Custom Search Design


In a previous post we've learned how to add Google Custom Search (GCS) to our blog or website. In this tutorial, we're going to learn how to customize GCS in a way that it's design will look much compatible with our site.

Step 1
Go to Google Custom Search Homepage.

Step 2
Click on the Search Engine you need to customize (if you've created more than one GCS, you could see all there).